alias f=flutter

# If you don't specify platform, you'll get a bunch of platforms!
f create --platform web my-flutter-project

f pub get  # Get the current package's dependencies

# Add the Provider package to pubspec.yaml
f pub add provider

f upgrade # Upgrade Flutter version

f doctor # Sanity-check Flutter environment

f clean # When you do something big, e.g., rename a Flutter project
With VSCode:
Flutter Hot-reload-on-save:
- Settings -> User -> Extensions -> Dart -> Flutter -> Hot Reload on Save -> allfDirty
Git Cheat Sheet from git basics class
One-liners (or few-liners) I use, but not often enough to memorize.
Find a process listening on a port
On a Mac, usually because I want to kill it. From find-the-process-listening-to-port-on-mac-os-x/.
$ lsof -nP -iTCP -sTCP:LISTEN | grep 8080
Linux date commands
$ date +%s
1447428499
$ date -d @1447428499  # Or on Mac, date -r 1447428499
Fri Nov 13 09:28:19 CST 2015
$ date
Fri Nov 13 09:28:35 CST 2015
$ date -d "Thu Nov 12 17:30:00 CST 2015"  # On Mac, something else
Thu Nov 12 17:30:00 CST 2015
$ date -d "Thu Nov 12 17:30:00 CST 2015" +%s
1447371000
# On Mac...
$ date -j -f "%Y-%m-%d %H:%M" "2015-11-12 17:30" +%s
1447371052

# Or use https://www.epochconverter.com/
Add a final newline to Python files in a repo.
VSCode has a nasty habit of saving text files w/o a final newline. This snippet will help fix a code base suffering from this malady...
find tests -name '*.py' | while read f; do tail -n1 $f | read -r _ || echo >> $f; done
ZSH
Word splitting
Unlike most other shells, zsh does not perform word splitting during variable expansion by default. Do this to make it so:
pkgs="aom apr-util"

for pkg in ${=pkgs}; do  # <-- Special syntax for word splitting; see "man zshexpn"
  echo "$pkg"
done

aom
apr-util
Juggle filename components using zsh array
# Split filename by '.' into fn, a zsh array (zsh arrays start at 1, not 0)...
for i in *.JPG; do fn=("${(@s/./)i}"); convert $i -resize '600x800>'  ${fn[1]}-resized.JPG;  done

# Rename .yaml files to .yml ...
for i in *.yaml; do fn=("${(@s/./)i}"); mv $i ${fn[1]}.yml;  done

# Convert extensions from lower-case to upper-case...
for i in *.png; do fn=("${(@s/./)i}"); git mv $i ${fn[1]}.PNG;  done
OR, just grab basename and extension directly
for i in *.JPG; do base=${i:r}; ext=${i:e}; echo magick $i -resize '600x800>' "${base}-smaller.${ext}"; done
Kubernetes
kubectl is a client wrapper around the k8s REST API.
Handy alias for kubectl: k
$ alias k='kubectl --kubeconfig ~/.kube/apprenticeship.tr-lab-chhq-1.yaml'

$ k config set-context --current --namespace=bg-helloworld-reference-impl-ns
Now I don't have to say "-n bg-helloworld-reference-impl-ns" after every command
# SSH to a running pod in a k8s cluster...

$ k get pods

NAME                           READY   STATUS    RESTARTS   AGE
codelabs-wl-77f89d845f-vr649   1/1     Running   0          24h

$ k get pod codelabs-wl-77f89d845f-vr649

$ k exec --stdin --tty codelabs-wl-77f89d845f-vr649 -- /bin/bash
See pod logs:
$ k logs reference-helloworld-wl-597c5744b4-wbwsc --all-containers
kubectl keeps its config in ~/.kube/config. Some top-level config objects:
- A list of clusters
- A list of users
- A list of contexts
- The current context
- Preferences
kubectl looking-around commands
$ kubectl get pods
$ kubectl describe pod <pod-id>
$ kubectl get namespaces
$ kubectl config current-context
Miscellaneous debugging:
$ kubectl config view # See what kubectl thinks your config is
k8s API and kubectl
(This is digressing from cheat-sheet into tutorial territory, I know...)
Kubectl is a command-line wrapper around the k8s REST API[^what-is-rest], which is actually many API's organized into purpose-specific API Groups. The list of apiGroups in an RBAC role definition's yaml corresponds to a component (aka "GROUP path segment") of the REST URL. For instance, this ClusterRole resource definition specifies rules for apis beginning with /apis/apps, /apis/networking.k8s.io, and /api.
apiVersion: rbac.authorization.k8s.io/v1
kind: ClusterRole
metadata:
  # "namespace" is omitted since ClusterRoles are not namespaced; thus,
  # entities in various namespaces can be associated (or "bound") to the app-deployer role.
  name: app-deployer
rules:
- apiGroups: ["apps","networking.k8s.io",""]
  # at the HTTP level, the name of the resource for accessing Secret objects is "secrets"
  resources: ["pods", "deployments", "ingresses", "secrets", "services"]
  # These correspond mostly to HTTP verbs, although k8s implements "create" and "update" with PUT
  verbs: ["get", "watch", "list", "patch", "delete", "create", "update"]
The "" entry represents the Core apiGroup, whose REST endpoints have no apiGroup component in their paths. In the URL, as the k8s api docs put it,
core resources use
/apiinstead of/apisand omit the GROUP path segment.
Calling the k8s REST API directly with HTTPS
Let's be an HTTP client (like kubectl), and make HTTP REST calls to k8s with curl.
This post has a pretty good walk-through.
How about getting info for a specific pod, as described in the k8s pod reference under Operations?
Assuming you have some pods running, first "cheat" and use kubectl to get a pod name, with kubectl get pods:
kubectl get pods
NAME                                   READY   STATUS    RESTARTS   AGE
blue-helloworld-wl-84c98bfbdf-29hh7    1/1     Running   0          25h
green-helloworld-wl-7fd747c8cb-h5cnx   1/1     Running   0          26h
Now, using the API reference, let's construct a URL. You'll need these pieces of info:
- The pod name
- The namespace name
- The base URL, which is your cluster's value of
serverin your~/.kube/config. From there, tack on the reference's indicated URL path, beginning with/apis. For instance...
https://047C9C71F223E20B1299471649359259.sk1.us-east-2.eks.amazonaws.com/api/v1/namespaces/appr-bg-hw-deploy-refimpl-ns/pods/blue-helloworld-wl-84c98bfbdf-29hh7
(Note that pods is a core API resource; we can tell because it uses /api instead of /apis in its REST path, and that path has no apiGroup component).
You'll also need an authorization token associated with your user or with a service account having sufficient permissions.
Postman is a great tool with which to poke at APIs. I used it to generate this curl command (and appended > pod.json):
token=aLongAuthorizationTokenStringAssociatedWithYourServiceAccount
curl -s --header "Authorization: Bearer $token" --cacert /tmp/ap-dev-use2-1.crt https://047C9C71F223E20B1299471649359259.sk1.us-east-2.eks.amazonaws.com/api/v1/namespaces/appr-bg-hw-deploy-refimpl-ns/pods/blue-helloworld-wl-84c98bfbdf-29hh7 \
> pod.json
Notice that I also passed a Certificate Authority (CA) cert into curl, so that it wouldn't fail with an SSL error. This cert file came from the certificate-authority-data field in ~/.kube/config for the cluster; because it's base64-encoded, it required decoding first:
encoded_token=aLongCopyPastedCACertFromKubeSlashConfig
echo $encoded_token | base64 -d > /tmp/ap-dev-use2-1.crt
(If you want to skip the SSL CA cert part, you can bypass --cacert and use the -k option instead).
You'll get back some JSON about the pod, saved into pod.json. If you like, you can parse and filter it with jq...
cat pod.json | jq '{state: .status.phase}'
"Running"
Exercise for the reader: Go back to where we used kubectl to "cheat" and get a list of pods. Instead of using kubectl, call the API directly with curl to get this list.
As a bonus, filter the JSON response with jq to print just the pod names. Hover here for a jq solution that prints pod names. Or here for a jq solution that prints more attributes of each pod.
[^what-is-rest] - What is REST? See Amazon AWS's What Is A RESTful API? for an overview.
Labels, Selectors, Annotations
Labels
Needed for gluing k8s resources together
For instance, a deployment resource must define a label in its pod template metadata, so that a service resource can select pods by-label for routing traffic to them.
Handy for getting organized - querying diverse k8s resources by-custom-label
For instance, a pod resource might belong to several categories of label:
labels:
  app: guestbook
  tier: backend
  role: master
  environment: qa
You can query pods by-label like this:
# -l <query> - this one shows pods in production AND qa environments;
# -Lrole displays value of ROLE label as a column in the output
#
$ k get pods -l 'environment in (production,qa)' -Lrole
- Label prefixes (
some-prefix/some-label) are optional. Handy for avoiding naming conflicts - Label values can be empty
- Total length must be 64 chars or less
Selectors
Below is an example of a service selecting a pod by its my-app app label.
---
apiVersion: apps/v1
kind: Deployment
spec:
  template:
    metadata:
      labels:
        app: my-app
...

---
apiVersion: v1
kind: Service
spec:
  selector:
    app: my-app
Annotations
Annotations, unlike labels, are NOT used for resources queries.
matchLabels, matchExpressions
For specifying set-based requirements in selectors. Supported by newer resources (but not by Service, which supports only equality-based selectors).
Labels and Selectors in Deployment manifests
Looking at deployment yaml, there are three different labels sections. Their content often tends to be similar or identical, so it's puzzling why they live in so many places. What are their purposes? (This explanation is inspired by a helpful goglides.dev post).
Consider this snippet of a typical Deployment yaml:
apiVersion: apps/v1
kind: Deployment
metadata:
  ...
  labels:
    app: my-web-app
    app_env: development
  name: the-web-app
  namespace: the-web-app-ns
spec:
  selector:
    matchLabels:
      app: my-web-app
      app_env: development
  strategy:
    rollingUpdate:
      maxSurge: 25%
      maxUnavailable: 25%
    type: RollingUpdate
  template:
    metadata:
      labels:
        app: my-web-app
        app_env: development
    spec:
      containers:
      ...
labels sections live in three places in a Deployment yaml:
- metadata.labels
- spec.selector.matchLabels
- spec.template.metadata.labels
Deployment metadata.labels
The deployment's metadata.labels support operations that want to select that deployment; for instance, querying with the -l flag to delete a deployment returned by the query.
Deployment spec.selector.matchLabels
A deployment uses its matchLabels selector to find the pods it’s responsible for managing. If no pods with those labels when the deployment is first created, the deployment will do nothing. But if there are, the deployment will manage those pods.
Deployment spec.template.metadata.labels
The deployment uses the pod template, including its metadata.labels, to create pods that can be selected by a service for routing traffic.
Ingresses and Ingress Controllers
An ingress is essentially a collection of rules sent to a controller that is listening for them.
Mac OS X keyboard shortcuts, and other tips/tricks
(Install and start KeyCastr if demo'ing keyboard shortcuts; shows keystrokes onscreen.)
First things...
- ⌘-SPC (spacebar), "sys", RETURN, and then search in System Settings for "customize modifier"
- Map Caps Lock to ESC. This will come in handy when you learn vim (you're going to learn Vim, of course ... ? 😃) Also, ESC cancels modal dialogs of various kinds, such as ⌘-SPC (Spotlight search).
In System Settings, search "mission", choose "Hot Corner Shortcuts"
Mission Control - bird's-eye view of windows, spaces, and apps
I set my hot corners to something like this...
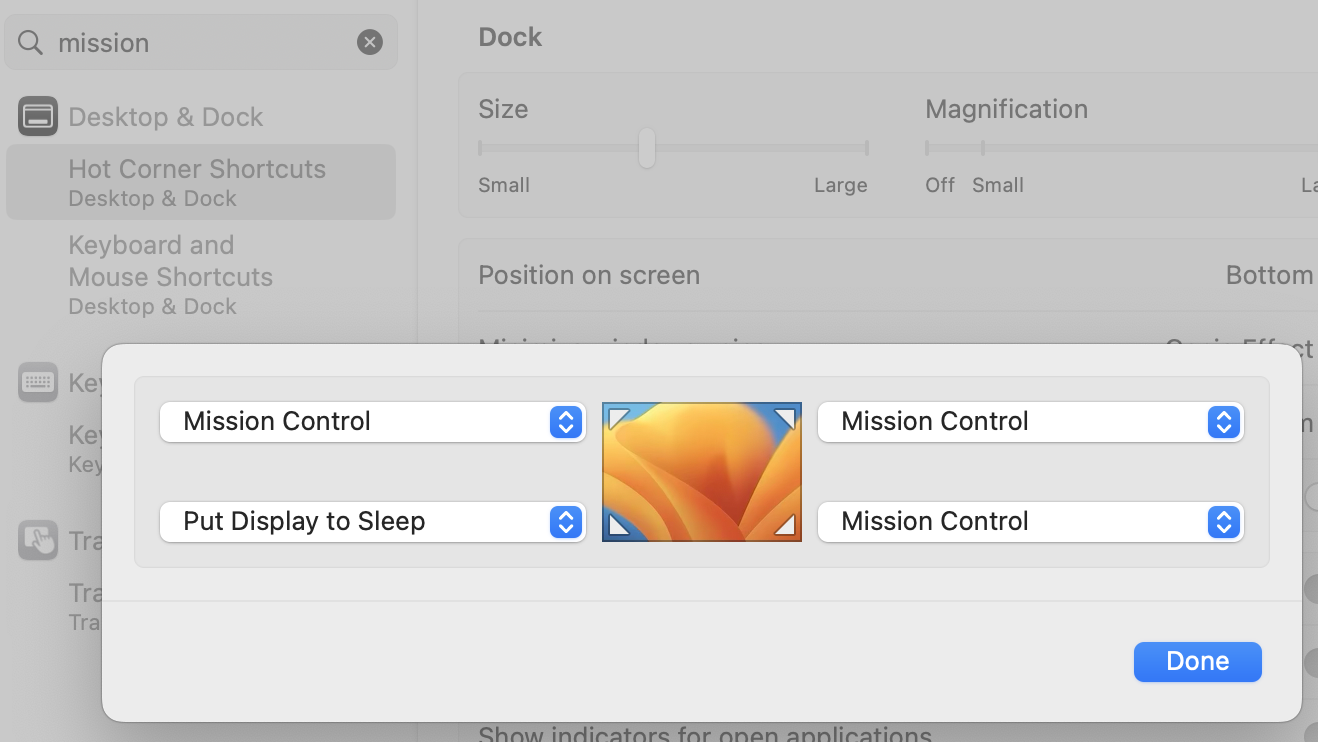
When you touch that screen corner with your mouse, the selected action happens.
Other "Mission Control" settings:
- OFF - "When switching to an app, switch to a space w/open windows"
- OFF - "Displays have separate Spaces"
General Keyboard Shortcuts
-
⌘-SPC - Spotlight. Search for anything on your Mac: apps, text, filenames, etc.
- What to search for?
- "ter" - Terminal.app - Sometimes just "t" is enough; Spotlight remembers frequency.
- "sys" - System Settings.app
- What to search for?
-
⌘-TAB - Cycle between open apps. (⌘-SHFT-TAB goes the other way).
-
⌘-n - New window in an app (e.g., new bash window in Terminal, new browser window in Chrome, new Finder window in Finder).
-
⌘-w - Close active window in an app (e.g. a tab in your browser).
-
⌘-` - Cycle between windows in an app.
-
⌘-, - Open an app's settings (aka preferences).
-
⌘-CTRL-SPC - Open the characters menu (emojis, symbols, etc.)
Capturing Screenshots
Selecting and capturing a portion of the screen
- ⌘-SHFT-4 - Drag the crosshair to select. Selected area is saved in a file on your Desktop.
- ⌘-SHFT-Ctrl-4 - Drag the crosshair to select. Selected area is saved to your copy buffer (paste with ⌘-v).
Selecting and capturing a window
- ⌘-SHFT-4, then SPC - When you tap SPC, the crosshair changes to a camera. The active window is saved in a file on your Desktop.
- ⌘-SHFT-Ctrl-4, then SPC - When you tap SPC, the crosshair changes to a camera. The active window is saved to your copy buffer.
Editing
- ⌘-c - Copy selected
- ⌘-v - Paste selected
- ⌘-x - Delete selected
- ⌘-z - Undo
App-specific shortcuts
Finder shortcuts
- ⌘-SHFT-n - New folder at top of hierarchy in current Finder view.
- ⌘-BKSPC - Delete highlighted item (e.g. a file). BE CAREFUL!
- <right-arrow> - Expand directory view.
- ⌘-<down-arrow> - Zoom Finder view to highlighted sub-directory.
- ⌘-<up-arrow> - Unzoom Finder view up on directory level.
Browser shortcuts
- ⌘-+ - Increase font size.
- ⌘-MINUS - Decrease font size.
- ⌘-0 - Restore default font size.
- Ctrl-TAB - Cycle between tabs in active window.
- You can drag a tab out into its own window (and drag it back in too).
Mission Control - bird's-eye view of windows, spaces, and apps
- When in Mission Control, add a workspace with "+" (top right corner)
- Ctrl-<up-arrow>
- Ctrl-<right-arrow>, Ctrl-<left-arrow> - switch workspaces
- Ctrl-<down-arrow> - app focus
While in Mission Control, you can drag windows around to various desktops.
To delete a desktop, hover over its thumbnail until a white "X" appears, and click the "X". (No windows in that desktop will be deleted; they will simply move to the previous desktop).
Hit ESC to exit Mission Control.
Gestures
In System Settings, search "gestures", choose Trackpad gestures.
Trackpad with drag lock:
- "use trackpad for dragging"
- "with Drag Lock"
Terminal.app (zsh)
- Tab to autocomplete file or directory names.
- ⌘-k - Clear screen, including scrollback history.
- ⌘-<double-tap> on a URL in the terminal window - Opens that URl in default browser.
- ⌘-TAB - Open a new shell in the same window.
- Ctrl-TAB - Cycle between tabs (similar to behavior with browser tabs).
- You can drag a tab out into its own window (also like browser tab, except that you can't drag it back in).
Explore
- Trackpad has "light" click and "firm" click (aka "force click").
- Function keys can be set to default to F1-12, or to the "other" mode (FN-<fn-key> accesses whatever the "other" mode is. ⌘-SPC, "function keys".
Setting up a Python venv in VSCode for your notebook
If a .venv directory exists next to a Jupyter notebook, VSCode will notice it. However, that's not quite enough; VSCode also needs to recognize that virtual environment as a Jupyter kernel. This is done by installing ipykernel (the wrapper around IPython that enables using IPython as a kernel) in that virtual env.
Create a .venv virtual environment for VSCode and identify it as a Jupyter kernel:
python3 -m venv .venv
. .venv/bin/activate
pip install ipykernel
In VSCode, open the folder containing your Jupyter notebook(s). NOTE: Don't just open a notebook without opening the containing folder; VSCode will NOT assume that you mean "use the folder with this notebook", and will get confused if no folder is open.
When you open the folder, and then the notebook in VSCode, VSCode will flash a message detecting kernels.... This is a good sign.
In VSCode, Cmd-Shift-P, and search for "kernel". Choose "Kernel: Select Notebook Kernel". Now that ipykernel is installed, the .venv containing it will show up as a kernel; choose that.
At this point, whatever you pip install into that activated .venv environment should be visible for import with code in your Jupyter notebook. E.g....
import pandas as pd
- Insert cell above: Cmd + Shift + A
- Insert cell below: Cmd + Shift + B
- Delete the current cell: Cmd + Shift + D
- Interrupt the Jupyter kernel: Cmd + Shift + F2
- Restart the Jupyter kernel: Cmd + Shift + F4
- Save the notebook: Cmd + S
- Toggle line numbers: Cmd + Shift + L
- Toggle the output of the current cell: Cmd + Shift + O
- Toggle the markdown preview: Cmd + Shift + V
Command mode vs input mode - ESC to go to command mode
Commands:
-
Run the current cell and select cell below: Shift + Enter
-
Run the current cell and add new cell below: Cmd + Enter
-
dd - delete cell
-
a - new cell above (new cell is selected, and in command mode)
-
b - new cell below (new cell is selected, and in command mode)
-
L - toggle line numbering
While in a cell in command mode:
- <Enter> - enter edit mode (whether markdown or code)
- Undo - Cmd-z
VSCode shortcuts:
- Cmd-Shift-P - open the VSCode command palette
Other References:
The Vault CLI - reading key-values
Vault does a lot of things. This page focuses on retrieving key-value pairs from a Vault "secret".
Get the Vault CLI
sudo apt install vault
If the install fails, you may need to add the repository to your machine.
See:
Get a Vault token
Assuming that ...
- You have Key-Values stored in a secret within a "v2 Key-Value" secrets engine on https://vault.mycompany.com (such as "ansible"), and
- You belong to a group with access to that engine, and
- Your group's policy lets you at least "read" and "list", ...then when you obtain authentication token, you'll be able to read those KV's.
$ export VAULT_ADDR=https://vault.mycompany.com
$ export VAULT_NAMESPACE=unix
$ export VAULT_TOKEN=         # Make sure VAULT_TOKEN is not set, otherwise the Vault CLI will use it instead of ~/.vault-token
$ vault login -method=ldap username=$(id -un)
Password (will be hidden):
Success! You are now authenticated. The token information displayed below
is already stored in the token helper. You do NOT need to run "vault login"
again. Future Vault requests will automatically use this token.

Key                    Value
---                    -----
token                  s.EqpuvurstSkoL8Xtnst0OKkB
token_accessor         XMueQHm6hVr77sHLubc6Q5Az
token_duration         1h
token_renewable        true
token_policies         ["default"]
identity_policies      []
policies               ["default"]
token_meta_username    cwalquist
Use the token for Vault key-value retrieval
Retrieve with curl
One approach is to curl Vault, using the token for authentication. This request returns a JSON bag of ALL the keys in the path (along with some metadata). jq is handy for parsing out what you need (in this case, the value of haproxy_license_key).
(Note the use of the Vault CLI to spit out a curl command).
$ vault read -output-curl-string concourse/myteam/mydeploy

curl -H "X-Vault-Namespace: unix/" -H "X-Vault-Token: $(vault print token)" -H "X-Vault-Request: true" https://vault.mycompany.com/v1/concourse/myteam/mydeploy

# Add a "-s" to suppress extraneous curl output...
curl -s -H "X-Vault-Namespace: unix/" -H "X-Vault-Token: $(vault print token)" -H "X-Vault-Request: true" \
  https://vault.mycompany.com/v1/concourse/myteam/mydeploy \
  | jq .data.k8s_server_url

"https://rancherqa.chhq.kube.mycompany.com/k8s/clusters/c-pwwrh"
# Use the Vault CLI to spit out json format directly
$ vault read -format=json concourse/myteam/mydeploy \
  | jq .data.k8s_server_url
Retrieve the key's value with the Vault CLI
$ vault kv get -field k8s_server_url concourse/myteam/mydeploy
https://rancherqa.chhq.kube.mycompany.com/k8s/clusters/c-pwwrh
Concourse - Retrieving secrets from Vault
In the mydeploy Concourse config, the git resource has a couple of references characterized by surrounding double-parens (( ... ))):
...
  - name: mydeploy-app-repo
    type: git
    icon: github
    webhook_token: ((mydeploy.app_webhook_token))
    check_every: 4h
    source:
      uri: git@github.com:myorg/mydeploy.git
      private_key: ((mydeploy.app_private_deploy_key))
      branch: main
...
These are Concourse Vars, referencing secrets in Vault.
Vault references are controlled by a Concourse-cluster-wide credential manager. This excerpt is relevant:
For credential managers like Vault that support path-based lookup, a secret-path without a leading / may be queried relative to a predefined set of path prefixes. This is how the Vault credential manager currently works; the key
foois expected under/concourse/(team-name)/(pipeline-name)/foo.
So for example, Concourse keys for the mydeploy pipeline in the myteam Concourse team must live in the designated Vault namespace (such as /unix), under the /concourse/myteam/mydeploy path prefix at https://vault.mycompany.com.
More Vault info:
For credential managers that support path-based lookup, a secret-path without a leading / may be queried relative to a predefined set of path prefixes. This is how the Vault credential manager currently works; foo will be queried under /concourse/(team-name)/(pipeline-name)/foo.
If you need to get hold of your cluster's CA chain, for purposes of configuring a k8s-resource in Concourse, https://technekey.com/how-to-get-kubernetes-ca-certificate/ has a one-liner ...
$ kubectl config view --raw -o go-template='{{index ((index (index .clusters 0) "cluster")) "certificate-authority-data"|base64decode}}'
Docker
alias d=docker  # Save typing

d inspect the-image-name-or-ID | jq '.[].Config.Cmd'
d image ls
d ps
Managing storage:
d history <image>
d system df

d image prune # clears images w/o tags (dangling images)
d builder prune # clears image build cache

d manifest inspect <image>  # on a remote registry only--not local
d inspect <container> | jq '.[].Config'
Other stuff:
d commit <container> <new-image-name>  # Snapshot a running container to an image

d volume create demo1 # Persistent volumes
Building and running; SSH'ing into a running container
$ d build --progress=plain -t tt .
$ d run -p 3000:3000 -it tt  # run the container
$ d run -p 3000:3000 -it tt /bin/bash  # Debug the container; overrides the Dockerfile's CMD or ENTRYPOINT directive
$ d exec -it $(docker ps | tail -1 | rev | cut -d'\'' '\'' -f1 | rev) /bin/bash' # SSH into the first running container
Build and tag an image at the same time, and publish to Artifactory, with a git sha as an image tag...
image_tag=`git rev-parse --short HEAD`
docker_tag=<company-artifactory-url>/apprenticeship-docker-local-default/bg-hw-deploy-refimpl:$image_tag
d build -t $docker_tag .
d push $docker_tag
The following command helped me debug an exec format error issue for a pod trying to start a container from my image; it showed that my helloworld image was an arm64 image.
d inspect helloworld | grep -i arch
I needed to tell Docker on my M2 mac to build for the linudx/amd64 platform, which I did using the --platform=linux/amd64 option to the FROM directive in my Dockerfile.
archived
Install fly, the Concourse-CI client
brew install fly
Authenticate the client to Concourse
-t is for target -- an alias to the set of credentials in ~/.flyrc that will authenticate you to the Concourse instance you want to work with (or "target"). ~/.flyrc can store multiple sets of creds.
Since you have to specify target with every fly command, set up an alias...
alias f="fly -t bg-hw-deploy-refimpl"
Authentication is stored in ~/.flyrc.
f login --team-name devops-apprentices --concourse-url https://concourse.drw
f sync   # Update fly CLI version to match Concourse server.
Creating and activating a pipeline in Concourse
cd concourse
f set-pipeline -c pipeline.yml -p bg-hw-deploy-refimpl
f unpause-pipeline -p bg-hw-deploy-refimpl
Some other things you can do with fly
f targets
f status
f userinfo
f teams
f logout
f sync
f workers
f containers
gcloud
Install gcloud
$ brew install --cask google-cloud-sdk
$ gcloud components install gke-gcloud-auth-plugin
$ gcloud init
Create a cluster
$ gcloud container clusters create my-cluster
Update ~/.kube/config to point kubectl at a specific cluster in GKE.
$ gcloud container clusters get-credentials my-cluster
Example of building an image tagged for pushing to my Google container registry repo
$ docker build -t us-east1-docker.pkg.dev/k8s-cluster-learning-393915/bg-hw-deploy-refimpl/app-image:1.2.10 .
Use gcloud to set up Google container registry repo for Docker images
$ gcloud services enable artifactregistry.googleapis.com

# Create the repo...
$ gcloud artifacts repositories create bg-hw-deploy-refimpl --repository-format=docker --description="blue/green helloworld app" --location=us-east1

# Use gcloud to add a credential helper to your ~/.docker/config.json...
$ gcloud auth configure-docker us-east1-docker.pkg.dev

# Now you can 'docker push' the tagged image...
$ docker push us-east1-docker.pkg.dev/k8s-cluster-learning-393915/bg-hw-deploy-refimpl/app-image
Set up some gcloud defaults to make subsequent commands easier...
$ gcloud config set artifacts/location us-east1
$ gcloud config set artifacts/repository bg-hw-deploy-refimpl

# These were already set during 'gcloud init' ...
$ gcloud config get compute/region
us-east1
$ gcloud config get compute/zone
us-east1-b
Stop the cluster nodes (e.g., to minimize ongoing charges)
gcloud container clusters resize my-cluster --num-nodes=0
Delete the cluster
gcloud container clusters delete my-cluster
Look at the pushed image...
$ gcloud artifacts docker images list
kubectl looking-around commands...
$ kubectl get pods
$ kubectl get namespaces
$ kubectl config current-context